
How To Combine Data From Multiple Sources For Cleaning And Analysis
June 2023
This article is rated as:


As a data analyst in the world of evaluation, much of my work at Three Hive involves combining similar datasets from multiple sources into one master file to analyze them in aggregate. For example, a recent project of ours involves combining patient experience data collected at two sites, one in the North and one in the South, to analyze together. Although both sites use the same survey questions, each site asks the questions in a different order and store their data slightly differently, which means merging these datasets takes a few extra steps. While I don’t believe there is a wrong way to merge datasets in situations like this, there are certain steps that I like to take to set myself up for a straight-forward analysis process. In this article, I’ll walk you through the steps I take when working through a task like this using a fake dataset as an example.
1) Before you start...
Pick an analysis program. The analysis program you use will impact some of the decisions you need to make about your data, so it is good to decide what you will be using as early in the process as possible! The program you use for data prep doesn’t need to be the same program that you conduct your analysis in, but it should be one that you are familiar with. For most of my analyses, Excel is usually powerful enough to do the trick, but you can choose whichever program you are most comfortable with as long as it allows you to explore the data and make changes where needed.
Start a ‘data diary’. This step might not be necessary if your data set is small and simple, but I find that it's helpful to record the steps I take in cleaning so they can be easily replicated in the future or adjusted if I realize I’ve made a mistake (which happens more often than I’d like to admit!). Lately, I have been using a tab on the project’s OneNote in our online work environment, but you can use any word-processing software that you prefer for this. In the past I have used physical notebooks as a data diary but found that this made it much harder to collaborate and share my process with the rest of my team. Whenever possible, I suggest using online documents that you can share across your notes with the project team!
Within your data diary, start preparing a data dictionary – this is where you can take notes about the variables in each data set as you explore your data. To learn more, check out our article on Data Dictionaries!
2) Explore your data (and take notes)
Explore your individual datasets. Work through each data set individually to understand what data was collected, and how it is displayed in your data processing software. I find it useful to create a list of the main variables in each dataset and write a short blurb about each in my data diary. This gives me a good overview of the data I will be working with and allows for easy comparisons in the next step of the process.
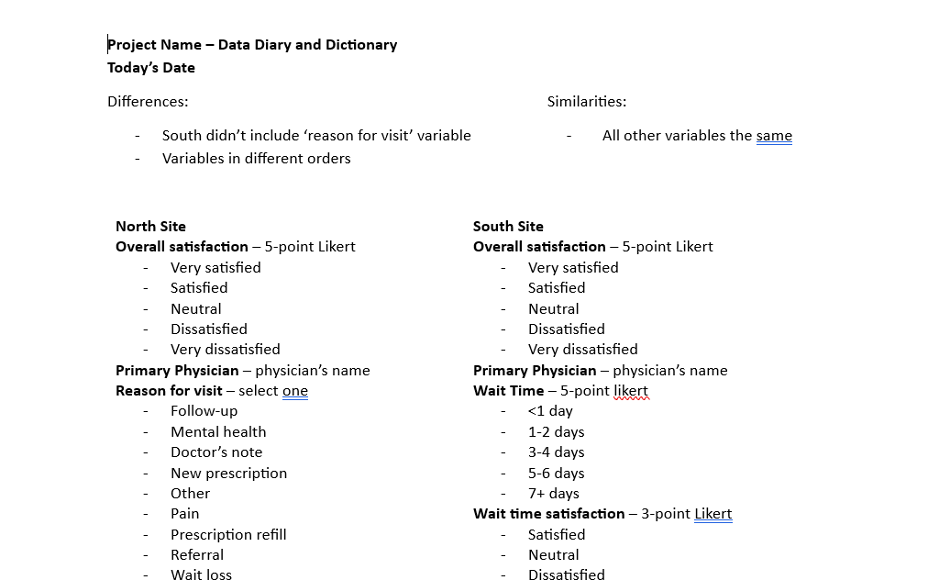
Compare similarities and differences. After exploring and making notes on each dataset individually, I compare my notes to find similarities and differences between them. In the project that involved combining data from the North and South sites, I noticed that both sites had the same main variables but that they were in a different order, and that the North site collected one extra piece of information than the South site did. For this project, my data diary and dictionary looked something like this after exploring and comparing the data:
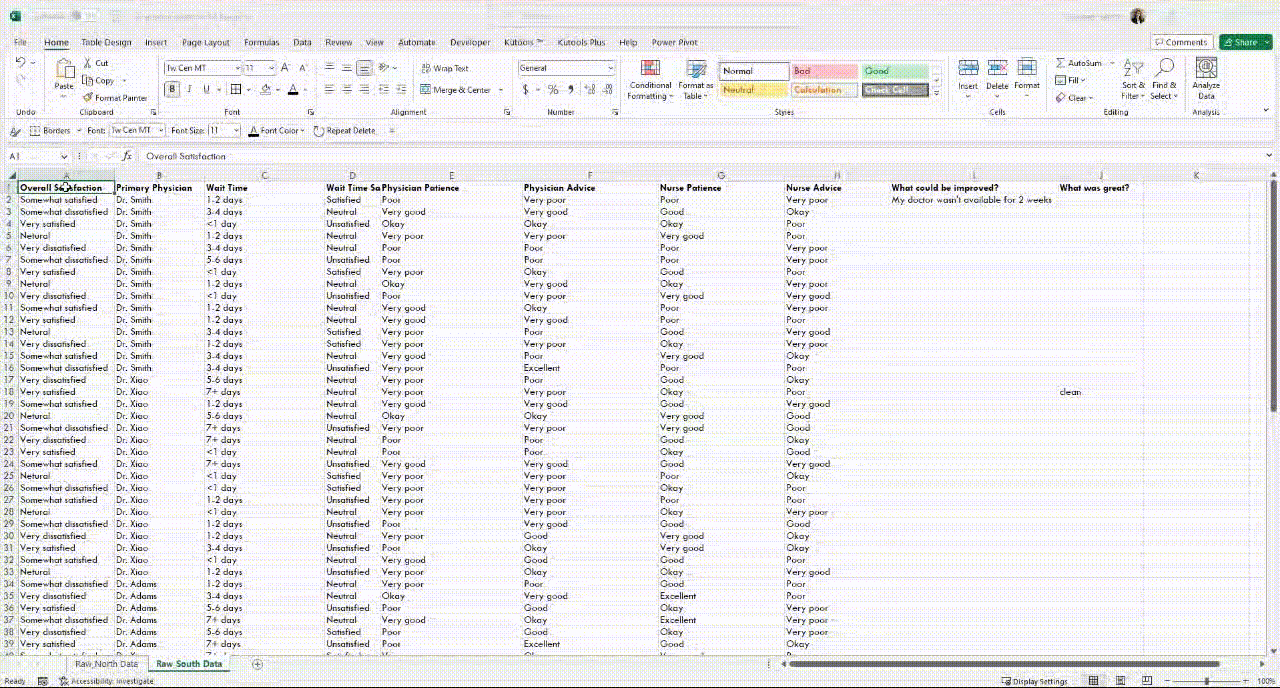
3) Prepare your original data. When I combine data in Excel, I like to copy and paste each individual dataset into a separate tab of an Excel workbook, like this:

Next, I assign identifiers to the individual data sets. This will allow me to link the responses from the master dataset to the original datasets if I need to make changes in the future. To do this, I create two new variables for each original dataset by inserting columns in Excel by right-clicking on the column header and selecting ‘Insert’ from the pop-up menu.
After inserting two new columns to the left, I will give them the titles of “ID” and “Source”
ID: This variable will assign a unique numeric value for each observation (row) of data within each original dataset. To do this quickly in Excel, you can type 1 in cell A2 and 2 in cell A3, then select both A2 and A3 and double click on the small green square at the bottom right of your selection to autofill the rest of the rows, like this:
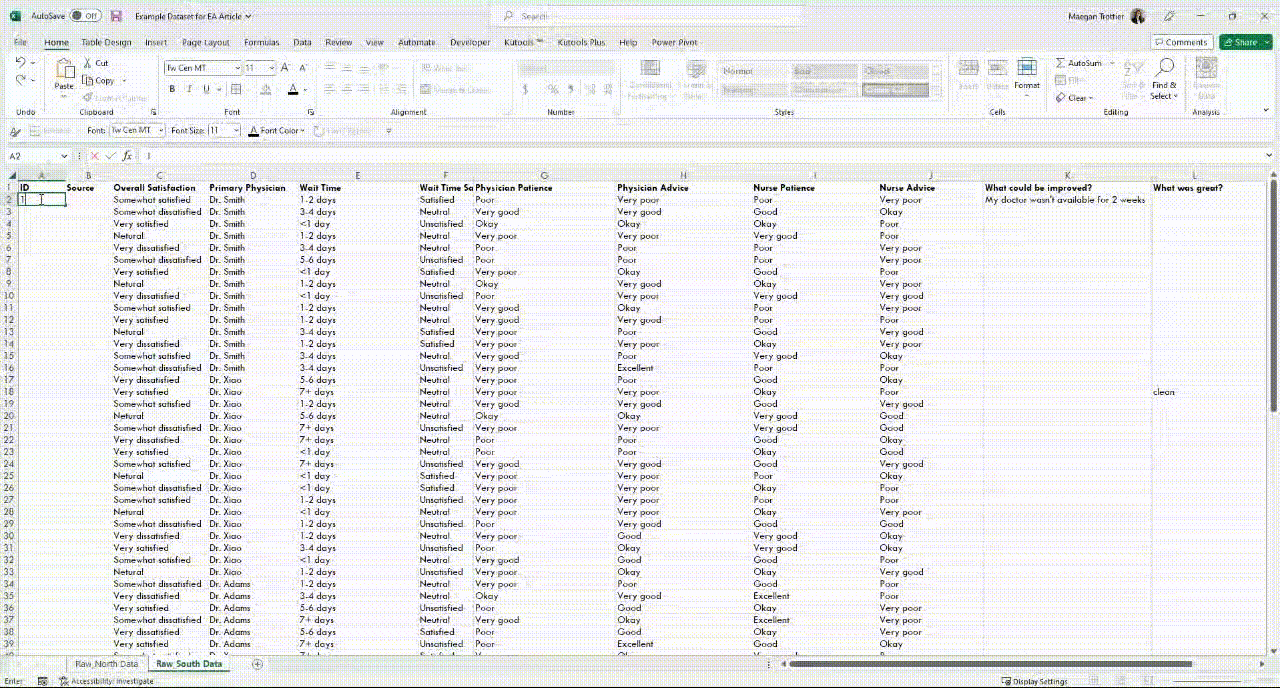
Source: This variable will be used to differentiate each observation (row) of data in the master dataset depending on which site it came from. To do this, I will label all the data in the North site dataset as “North” and all the data in the South dataset as “South”. When we eventually combine all the data into one master dataset, this will allow me to easily determine which site each piece of data came from.
Repeat this process for each individual dataset you have, being sure to assign a different 'Source’ name for each dataset. Each dataset should now look something like this:

4) Prepare your master dataset. Once I have gone through and compared the variables in each data set to determine which can be combined and which cannot, I create a new worksheet using the ‘+’ sign to the right of my workbook tabs to lay out the variables that will be in my master dataset.

At this point, there are a few decisions to make!
In our example, the North and South sites organized their variables in different orders. I like the way the North site ordered their variables, so I will use their ordering, but you can choose what works best for you.
The North site also collected information on the reason for each respondent’s visit to their doctor, which the South site did not collect. You may choose to include or exclude variables that aren’t present in all datasets depending on what types of questions you are hoping to answer. In this case, it could be useful to see if wait times for patients varied depending on the reason for their visit, so I will include the ‘Reason for Visit’ variable even though the South site did not collect that information.
Once you have decided which variables you will include in your master dataset, and in which order, you can start typing out the variable names as headings in row 1 of your master dataset worksheet. Your workbook should now look something like this:
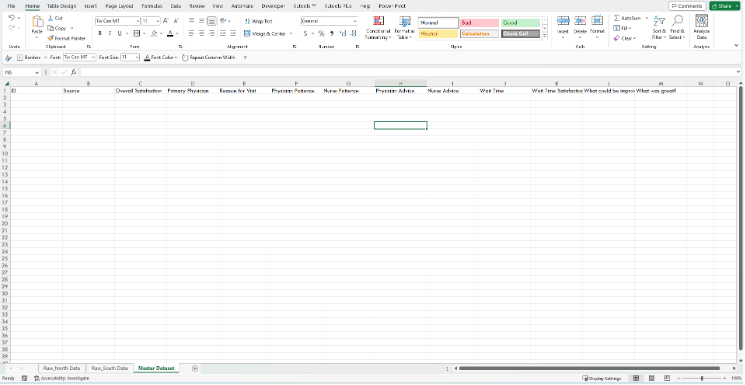
Convert your master dataset outline into a table for easy sorting for our next step by selecting the headers and one row down, clicking ‘Insert’, ‘Table’, checking the ‘My table has headers’ box (if it isn’t already checked), and ‘Ok’.

5) Combine your data. All that’s left now is to combine the data from our original North and South datasets into our master dataset! To start, copy all the ID and Source values from each original dataset and paste it into the ID and Source columns of the master dataset. The table you made in the last step will automatically update to add in all the rows of data you have just pasted.
For the rest of the data, the way you choose to add it to your new master data table will depend largely on the size and complexity of the dataset.
For small datasets like in our example, it can be as easy as copying data from one variable at a time and pasting it into the corresponding column in our master dataset, double-checking that you are pasting the data into the correct column and rows each time.

Since the South site didn’t include a ‘Reason for Visit’ variable, I added in a value of ‘Not asked’ which will be more helpful to me during analysis than leaving those fields blank.
*Tip: If you’re like me and tend to get lost in your head when working through repetitive tasks like this only to question what you did later on, I have found it helpful to voice record myself narrating each step as I do it. Once I have finished the copy-and-pasting of data, I replay my voice recording and type out what I did into my data diary. This way, I never have to question if I *actually* pasted all the data from all the sources I needed to!
For larger or more complex datasets, you may need to use a function like XLOOKUP or the PowerQuery tool to avoid spending too many hours copying and pasting data across sheets.
Power Query for Data Preparation Tutorial by Eval Academy.
XLOOKUP function for multiple criteria by MyExcelOnline,
6. You’re ready to clean! Once all the relevant data has been copied and pasted from all source datasets into your master dataset, you are ready for data cleaning. Check out our Data Cleaning Toolbox article for guidance on cleaning your new master dataset!

It can be intimidating to try combining datasets that aren’t perfectly aligned, but by taking some extra time at the beginning to understand the data you have and the result you are aiming for, you can create a clear road map for yourself and your team! Not only can this help to make the process much smoother, but it may also inspire new ways of analyzing and describing the data.