
How To Link Surveys In Qualtrics With A Participant ID
January 2024 (Updated March 2026)
This article is rated as:


This is a step-by-step guide for linking your surveys in Qualtrics with a participant ID to assess change over time. There are ways to set up these surveys to automate the process to a greater degree than what will be covered in this article. Qualtrics has a support article that has more details for how to do those things such as automating Qualtrics to randomly generate participant IDs or setting up a way to automate the survey distribution to an email list.
The steps below outline ways to link your surveys with a participant ID that is manually entered by participants, rather than automatically generated, and assigned. Please note that you can only link surveys using a paid version of Qualtrics.
What does it mean to link your surveys?
Linking surveys together means that you’re connecting the data from all your surveys in a way that lets you track an individual respondent. For example, if Kay fills out survey 1 about how they like dogs more than cats, and then changes their mind 6 months later when they take survey 2, you’ll be able to see that pattern in the data on an individual level if the surveys are linked.

Why would I want to link my surveys?
If you want to know how individuals are influenced and change their behaviours or views over time, linking surveys can help you see that in the data at a greater detail than if your data was only in an aggregated form. Linking surveys is a useful method for collecting longitudinal data.
For example, let’s say you were trying to measure the influence of an ad campaign that is trying to get people to like cats more than dogs. You can do a regular survey BEFORE the ad campaign runs and find the total percentage of people who like cats more than dogs. And then you can do another regular survey AFTER the ad campaign to see if that percentage has increased. However, your results won’t tell you if most of the people who changed their opinions were between the ages of 30-40. It also wouldn’t tell you if some people who liked cats more than dogs changed their minds too. Linking surveys can allow you to see more details in the pattern of your results.
Does linking surveys reveal a participant’s identity?
Linking surveys lets you track individual data confidentially. You can set up linked surveys so that any personally identifying information is not linked directly to an individual’s response. This means that when you are looking at the survey data, you’ll see the answers given by participant 1, but you won’t know their specific name or contact information. A confidential survey is different from an anonymous one. Linked surveys cannot be anonymous because they generate a list of everyone who has taken the survey. If you are using this method, it is important to help your participants understand that while their responses are confidential, they are not anonymous.
To learn more about the difference between confidentiality and anonymity in evaluation, check out, “Your information will be kept confidential: Confidentiality and Anonymity in Evaluation.”
Before we get to the details, I want to remind you that it is best practice to test the survey functionality and pilot it prior to sending it to participants.
How to manually link surveys in Qualtrics
Setting Up Survey #1
1. Create your first survey in Qualtrics as if you are setting up a regular survey.
2. At the beginning of your survey, create a survey question that will determine the participant ID. This is the ID that a participant will need to remember and enter to access the second survey.
For this guide, we will use the participant’s email address as the ID. We chose to create a text entry question that asks, “What is your email address?”. You can choose a different identifier like a phone number or a name – something that the participant will remember easily. We also added a content type validation requirement to the question so that any response that isn’t a valid email address will be rejected. This is an optional step, but I would recommend you add it to limit the number of human errors from your respondents like typos.
Make this question mandatory. It is recommended that you put this question near the beginning of your survey so that participants will fill it out even if they exit the survey early.

3. Go to the “Survey flow” tab.

4. Select “Add a New Element Here.”

5. Select “Embedded Data.”

6. Type in a label for your participant ID. Since we’re using email addresses, we just wrote, “Email Address.” Do NOT select an option from the drop-down list.


7. Next, click on “Set a Value Now.”

8. For “Set a Value Now,” you will need to choose the survey question that you had created for your participant ID. In the drop-down list, select “Insert Piped Text,” then “Survey Question.” Find the question you created for the participant ID. There will be one more panel that appears with options. Select the box that has the actual question. For us, it is “What is your email address?” Do NOT select “Question Text.”

9. Select “Apply.”

10. Next, go to the “Workflows” section.

11. Select “Create a workflow” and choose the option “Started when an event is received.” Another page will pop up that will list different types of extensions.

12. Choose the extension “Survey response” by Qualtrics. This means that you are now creating a workflow within Qualtrics that will be triggered when someone responds to your survey.

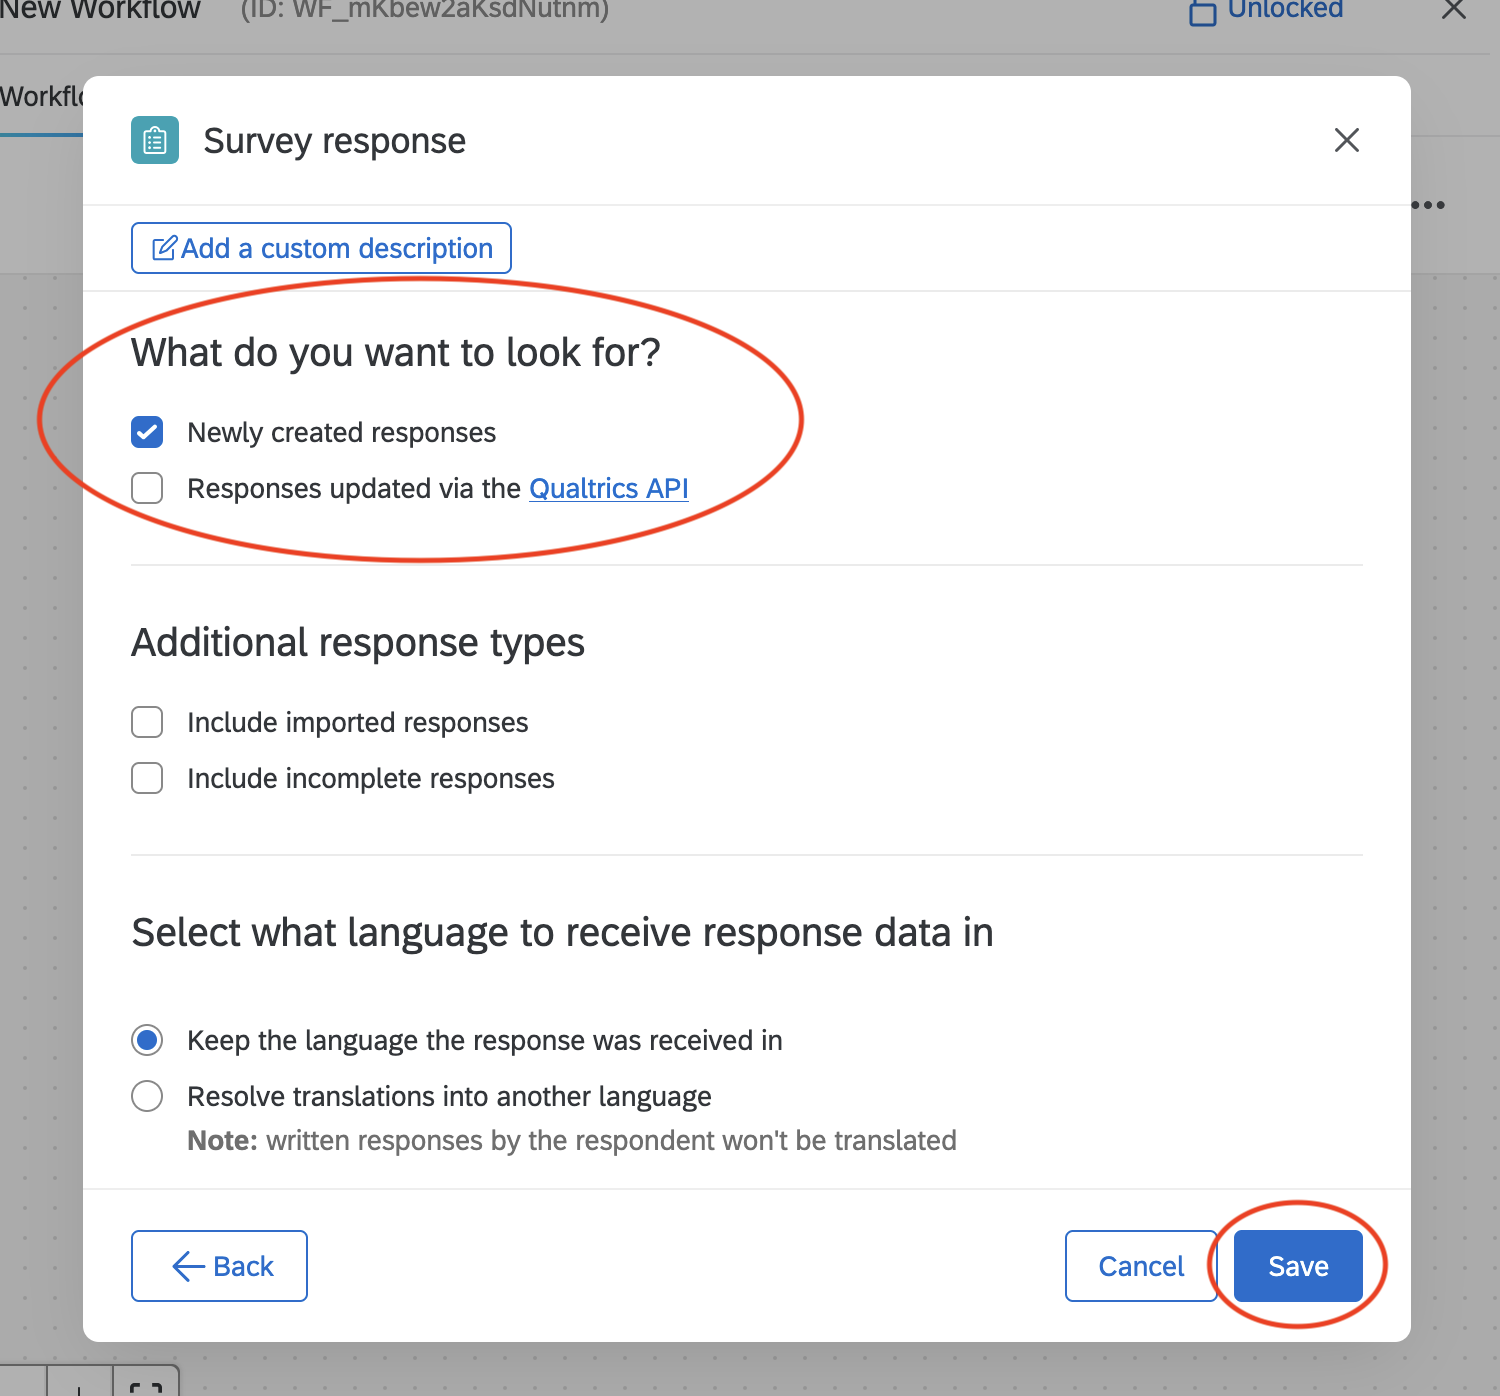
13. In the next set of options that appear, make sure that “Newly created responses” is checked. You can make selections under “Additional response types” as you prefer. Select “Save” when you are done.
14. Next, select the plus sign (+) and then select “Add a task.” Another panel with an extension will appear.
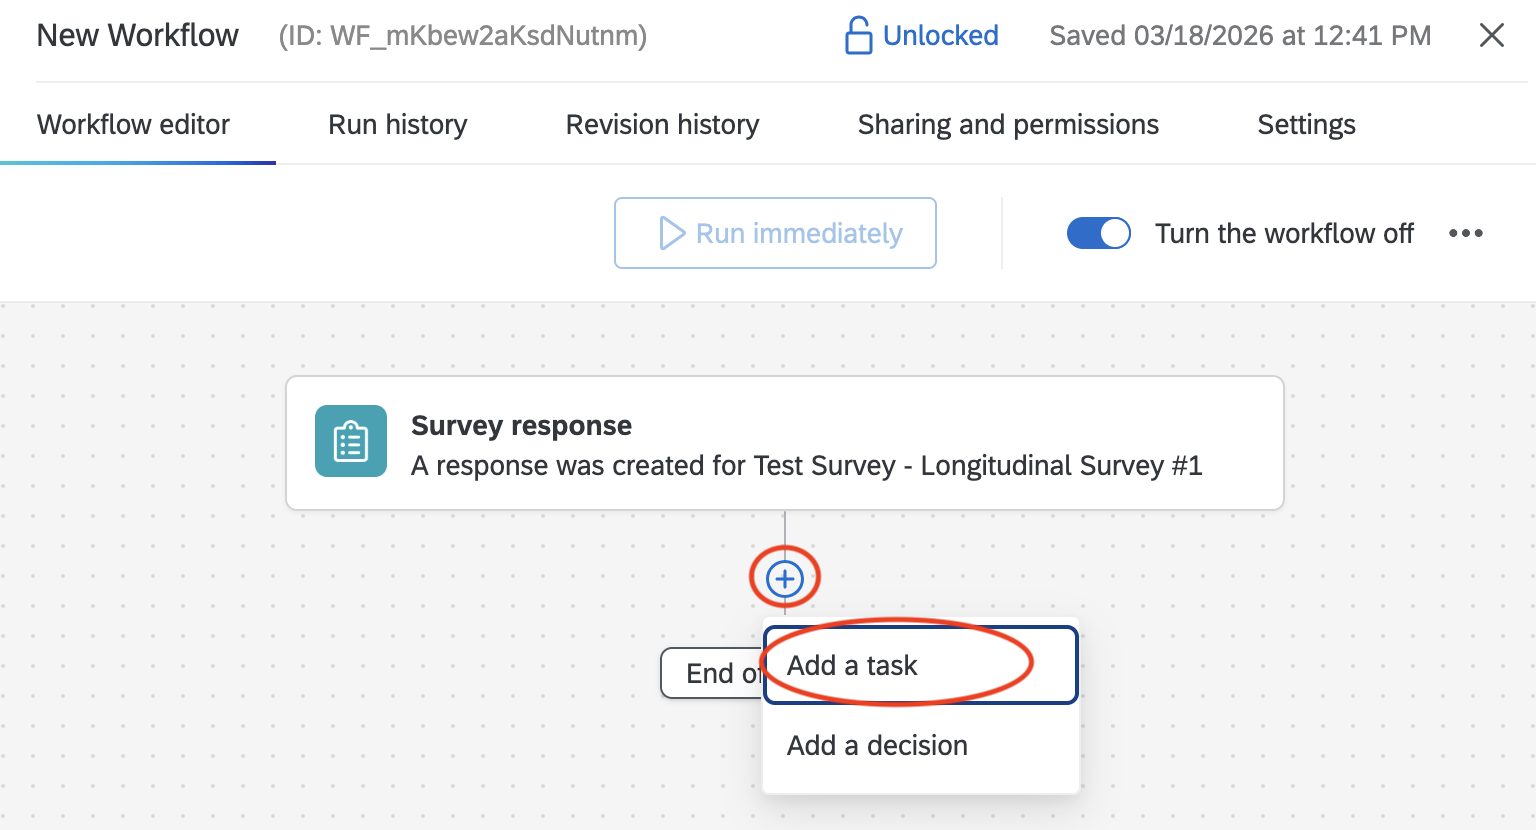
15. Select the extension “XM Directory” by Qualtrics. Don’t use any of the other extensions that have “XM Directory” in its name.

16. A new panel with fields will appear. What you will be doing at this point is creating a contact list for participants that will be stored on Qualtrics. This contact list is how Qualtrics will recognise the participant IDs when they are entered to access the second survey.
Select the drop-down box for “Contact List.” From there, you will select “My Library,” and then “New Contact List.”


17. Create a name for your participant contact list. Then select “Save” to exit the window.

18. Next, select the drop-down box for “External reference ID.” From the list, select “Embedded Data Field” and then select the name of the label you created for your participant ID in step 6. For us, the name we chose was “Email Address.”


19. Leave the other settings under “Contact update options” as the default settings. This means that “Save or update it as embedded data to your XM directory contacts” is selected and “Update recipient from survey response” is checked. Save to exit the window.

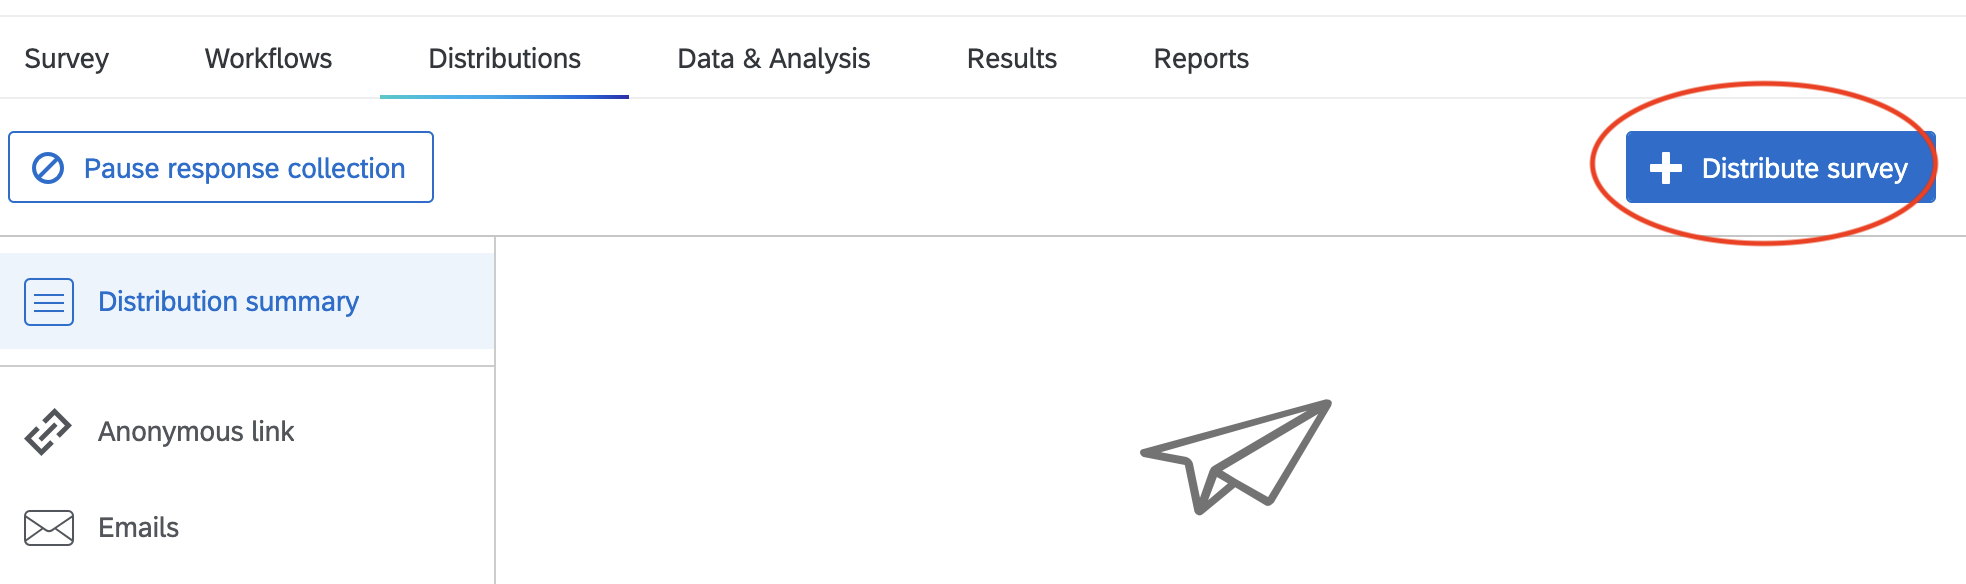
20. Your first survey is now ready to be distributed. After publishing your survey, go the “Distributions” tab at the top of the screen. Under “Distribution summary,” select the “Distribute survey” button on the top right.
In the window that opens up, make sure you use the “Get a single reusable link” to distribute your survey. That will give you a single anonymous link that can be sent to all the participants. This survey shows as a regular survey. When the respondent submits their response, their information will get added to the contact list associated with your survey.

Congratulations! You have just set up your first survey! Try testing it out and if you encounter any problems, contact Qualtrics Support and someone will help you troubleshoot your issues.
In my experience, it takes Qualtrics a few minutes to update your survey with the changes you’ve made. If you don’t see your changes right away, wait and try again before contacting support.
Setting Up Survey #2
21. Create your second survey like you would for a regular survey. This one doesn’t need a specific question for the participant ID. If you are asking the same questions as survey #1, I would recommend copying that survey and editing it to make sure your questions are worded in the same way.
22. Go to the “Survey flow” tab and select “Add a New Element Here.”

23. Select “Authenticator.”

24. Select “Move” on any question blocks you have and move them underneath the Authenticator element. If you have multiple question blocks, be sure to move and arrange them in the correct order for your survey.

25. “Authentication Type,” should be set to “Contact.” And under “Authenticate Using Contact,” select the same library you used in step 16 of survey #1. When you select the library, another drop-down list will appear for contact lists. Select the contact list you created in in step 16 of survey #1. Ours was labelled, “Longitudinal Survey Test Contact List.”

26. After selecting your contact list, another section called “Authentication Fields” will appear. Under this section, select “External Data Reference” in the drop-down box, then type in the label you chose for the participant ID you selected in step 6 of survey #1. For us, we had chosen “Email Address” so that is what we wrote in this box. Leave the “Password” and “Pre-fill” boxes UNCHECKED. Apply your changes.

27. You can now publish your survey and get it ready for distribution. When you are sending it out, make sure you use the “Get a single reusable link” option from the “Distributions” tab like in the previous survey (See step 20 for a refresher). That will give you a single anonymous link that can be sent to all the participants. After receiving the link, they will be taken to a page where they will have to enter their participant ID before accessing survey #2. Requiring participants to enter their participant ID ensures that their survey #2 responses are linked to their survey #1 results.
Anyone who has not taken survey #1 will NOT be able to access survey #2, unless you add their contact info manually to the corresponding contact list in Qualtrics. This is the contact list you created in step 16 of survey #1.


And that’s it! You have just linked your second survey to your first! If you don’t get the result you want after testing it out, contact Qualtrics Support and someone will help you troubleshoot your issues. Sometimes it takes a few minutes for Qualtrics to update your changes, so wait a little bit before testing.